

USB recovery becomes urgent at the least convenient moment. You plug in a flash drive to send a proposal, print an assignment, or open photographs, and the folder you need is gone. The temptation is to reconnect the drive repeatedly or accept whatever repair Windows suggests. Before doing either, leave the drive unchanged. Missing files may still be recoverable, but new writes can reduce that possibility.
Drecov gives Windows users a way to search stable USB storage, inspect recoverable content, and save selected files to another drive. The useful starting point is not a scan button, however. It is working out whether the files moved, whether another copy exists, and whether the device remains reliable enough for a software recovery attempt.
What Happened to the Files
A missing folder can have several explanations. Someone may have moved it to a different computer, saved the latest version elsewhere, or deleted it during a cleanup. Windows may also assign a different drive letter, making a shortcut point to the wrong place. Open the drive itself rather than relying on an old shortcut, and search for a distinctive part of the filename.
Think back to the last successful use. Did the drive hold the original document or just a copy? Was a transfer interrupted? Did anyone format it for another device? Those details help you choose between searching existing copies and scanning for deleted content.
If Windows asks you to format the USB drive, cancel the prompt. Formatting is not a prerequisite for recovery. Likewise, avoid initializing the device or running repair commands before preserving the files. A readable drive with missing content and a device that constantly disconnects require different responses.
Check the Easy Copies
Check the computer that last opened the file. Recent-document lists, Downloads, Documents, email attachments, and shared folders can reveal a surviving version. If the USB drive carried a presentation to another office, ask whether the recipient copied it locally. An editable original may be more useful than recovering an outdated export.
Do not assume that a USB deletion will appear in the Windows Recycle Bin. Removable-drive deletions often bypass it. If the missing file originally lived on the PC, though, checking the bin is worthwhile. The Recycle Bin recovery resource covers that separate situation.
Cloud history can also help, but only when the file was actually uploaded. A sync icon elsewhere on the computer does not protect every folder on a USB drive. Download a usable surviving copy to healthy storage and confirm its contents before deciding whether a scan is still necessary.
What Drecov Brings
Drecov supports recovery attempts on USB drives and other Windows-accessible storage. It can search for documents, photographs, videos, archives, audio, and other file types, which suits a portable drive carrying a mixture of personal and work material.
The software provides read-only scanning, file filtering, previews for supported formats, and quick and deep search options. Those features help users move from a large results list to a small set of useful files. Its USB data recovery gives more detail about the relevant storage scenario.
Read-only scanning does not make the whole computer write-free. Other applications can still access the drive, so close unnecessary programs. Recovery also depends on what remains: overwritten content may be gone, and a physical fault can put a device beyond a sensible DIY attempt.
Recover with Drecov
Prepare a healthy destination with enough free space before starting. Install Drecov away from the affected USB drive and keep the drive connected only as needed for the recovery attempt.
Step 1 Choose the USB Drive
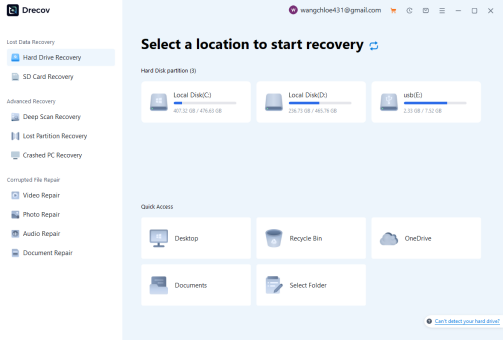
Open Drecov and identify the connected USB drive by its name, capacity, and drive letter. Select that device as the source. Do not choose Desktop merely because that is where you want the results to go. The source is where the missing files previously existed; the destination comes later.
Step 2 Search for Lost Content
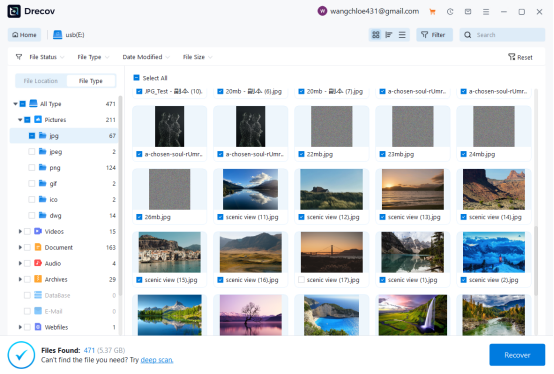
Start the scan and review its results. If the first search does not locate the expected files, use Deep Scan Recovery for a more thorough examination. Scan duration varies with capacity and device condition. Leave the USB drive connected, avoid saving anything to it, and use the available pause and resume controls when needed.
Step 3 Narrow the Results
Use File Location to inspect folders when the original paths remain available. Switch to File Type when you need documents, photographs, or videos but cannot remember a name. Search and Filter can narrow the list further. Preview supported files and tick only the items you need, rather than restoring thousands of unrelated results.
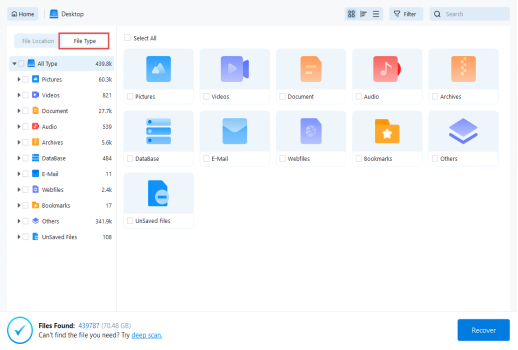
Step 4 Recover Elsewhere
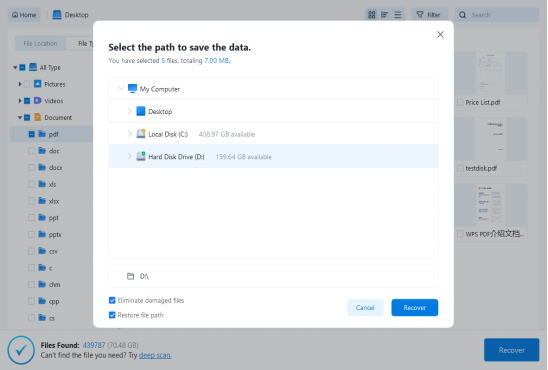
Click Recover and select another healthy drive. For a USB source, a folder on the computer’s healthy internal drive or a separate external drive may be suitable. Never save recovered files onto the same USB device. Once recovery finishes, open the destination folder and test the selected files in their normal applications.
Give the Drive a Break
Once you identify a genuine loss, stop adding files to the USB drive. Do not install recovery software there, save screenshots there, or copy restored items back onto it. Deletion can leave data behind until the device reuses the space, so even an unrelated transfer may overwrite something important.
Connect the drive through a reliable port and avoid loose hubs. If Windows can read it consistently and its capacity looks correct, a software scan may be reasonable. If it overheats, drops out repeatedly, or freezes the computer, disconnect it and seek specialist advice. Repeated scans do not cure failing hardware.
On a shared work computer, let colleagues know the device is awaiting recovery. A well-meaning attempt to tidy or repair it can make the situation worse. Keep a note of the original drive and the destination you will use; confusing the two is an avoidable risk.
Check the Useful Details
A recovered file is useful only if it contains the right information. Read the last pages of a report, inspect spreadsheet formulas, and compare document dates with any surviving copies. For photographs, check dimensions and open the full image rather than trusting a thumbnail. Play important videos through, including their audio.
Some results may have generic names or missing folder paths. Create a separate review folder and rename verified copies there, keeping the raw recovered set unchanged until you finish checking. A damaged archive or incomplete document may need another source copy rather than another scan of the same device. If you are looking for a particular exported report, the PDF recovery topic is relevant.
Make the Next Transfer Safer
Treat a USB drive as transport, not the only home for important files. Keep the original on your computer and maintain a separate backup. After transferring material, open a few key files from the destination before removing the source copy. A completed progress bar does not tell you whether you transferred the right version.
Use clear folder names and include dates where versions matter. Safely eject the device after writes finish, and replace a drive that has become unreliable. Keep private recovered documents in approved storage rather than scattering copies across shared computers.
USB recovery cannot promise every file back, but a measured response preserves more options. Check surviving copies, protect the device, and use Drecov on stable storage to search, preview, and recover the files you need. Then give those files a second home so the next misplaced drive does not become another emergency.
